


janetclark
Well-known member
Hi folks,
I’ve been busy making my moth trap, the whole thing has cost under £15, I bought scrap peaces of wood used for skirting-boards for £1-50, and the back off an old wall unit (easy to get for nothing from your local tip) one sheet of 2mm Perspex 15” by 15” for £5-27, and the 100w Actinic bulb and mount for just under £4, I still have to buy the electric cable tomorrow witch wont be over £3.
I didn’t use any plans I made it up as I went along, I made a couple of small mistakes, and had to backtrack a bit, but I’m pleased with how it turned out, it’s taken two days to make but I have enjoyed myself.
Janet.


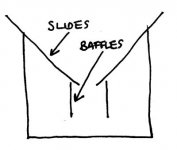
") and I’ve got the of-cuts left witch today I will fit as baffles.
and I’ve got the of-cuts left witch today I will fit as baffles.

